- USDT(TRC-20)
- $0.0
You really should be using two-factor authentication for all your important accounts. An extra layer of added security, with a six-digit passcode that’s regenerated every 30 seconds, is essential for keeping your digital accounts safe and secure. But the question is, how do you go about it in a way that’s actually easy to use?
Options are aplenty—Bitwarden and 1Password both have stellar two-factor authentication features built-in—but these apps cost money, and they’re ultimately third-party options, rather than something built into our devices. The new Passwords app in macOS Sequoia offers a one-stop shop to manage all your passwords. Plus, now there's a dedicated section that shows all the two-factor codes together, just like a third-party app like 1Password. This will make it easier to use two-factor codes even if you aren't using the Safari app.
This feature syncs across all your devices using iCloud, so all the two-factor codes from your iPhone will be available on your Mac, and vice versa. (Here’s how to use the two-factor process for iPhone and iPad.) And if you use Safari, you can enter two-factor authentication codes simply by using Touch ID, with no need to dig into a password management app.
Setting up two-factor authentication on macOS is easy—you can scan a QR code for an automatic setup, or enter a code manually, and you’re good to go. The process for most websites, apps, and services is the same. In this example, I'll be using a Microsoft account in the Safari browser. You’ll need to first add the website login to the Passwords app (save it to iCloud).
Note that, at time of writing, you'll need to install the macOS Sequoia beta to use this feature. It's best to do this on a backup machine if possible, as using a beta risks instability. To install the beta, open System Settings, then navigate to General > Software Update. Finally, click Beta Updates and select the macOS Sequoia developer beta.
To begin, open the website, and find the two-factor authentication feature in settings. In your Microsoft Account, go to Security > Manage how I sign in > Enter a code from an authenticator app to get started.
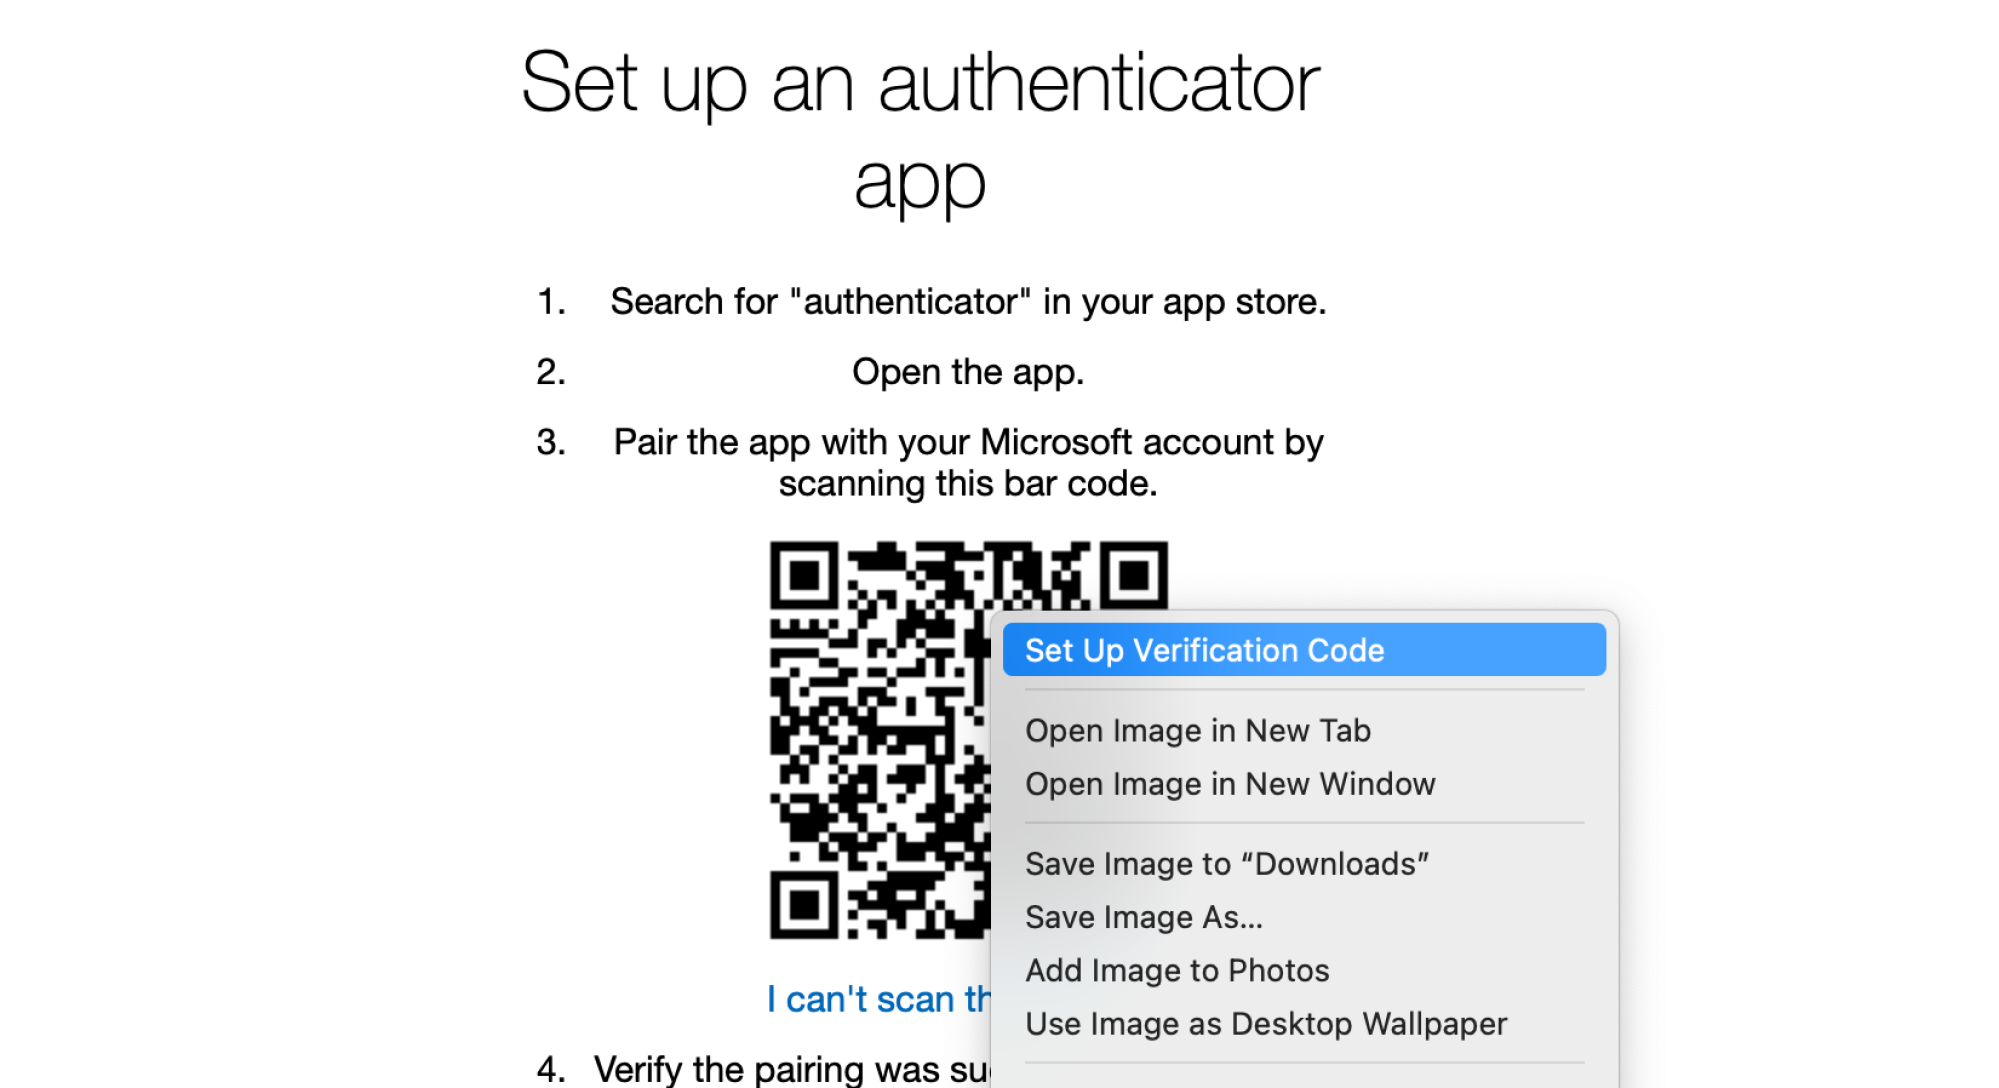
You'll see a new page for setting up the authenticator app. This will be similar no matter which service you're using. The default option will be to scan a QR code for automatic setup. Don't worry—you don't need to use a camera to scan this QR code. This feature is used as an express setup, to automatically link your account to the Passwords app. If you want to do it manually, you'll also find an option that says, "I can't scan the bar code." This will give you a numeric code that you can enter in the login page in the Passwords app.
In this case, I'm focusing on the QR-code setup. Simply right-click the QR code, and choose the Set Up Verification code option.
Credit: Khamosh Pathak
This will open up the Passwords app. Here, enter your device password, or use Touch ID to unlock the app.
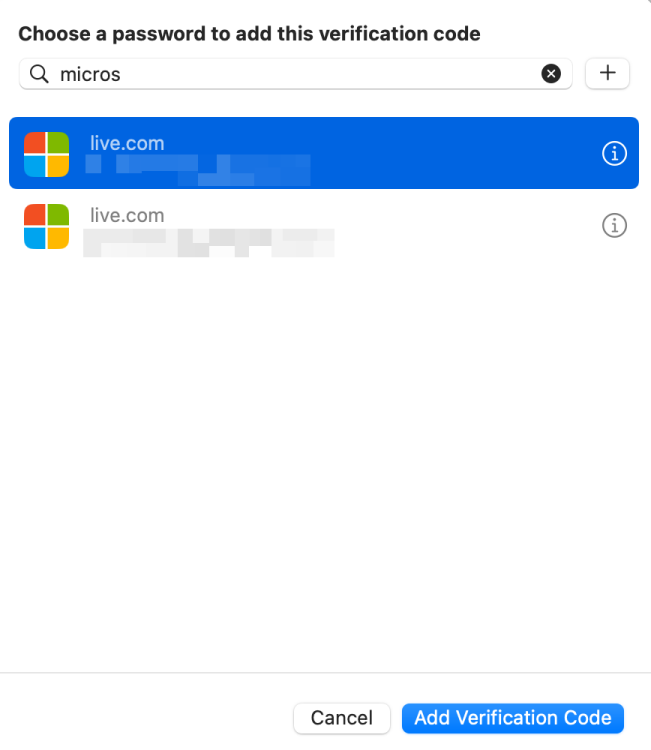
The Passwords app will now ask you to choose the login to link the two-factor authentication. Use the search bar to find the appropriate account, and click Add Verification Code button.
Credit: Khamosh Pathak
Instantly, the two-factor authentication will be paired, and you will see a new Verification Code section in the account details. You can click the code to copy it to your clipboard.

Credit: Khamosh Pathak
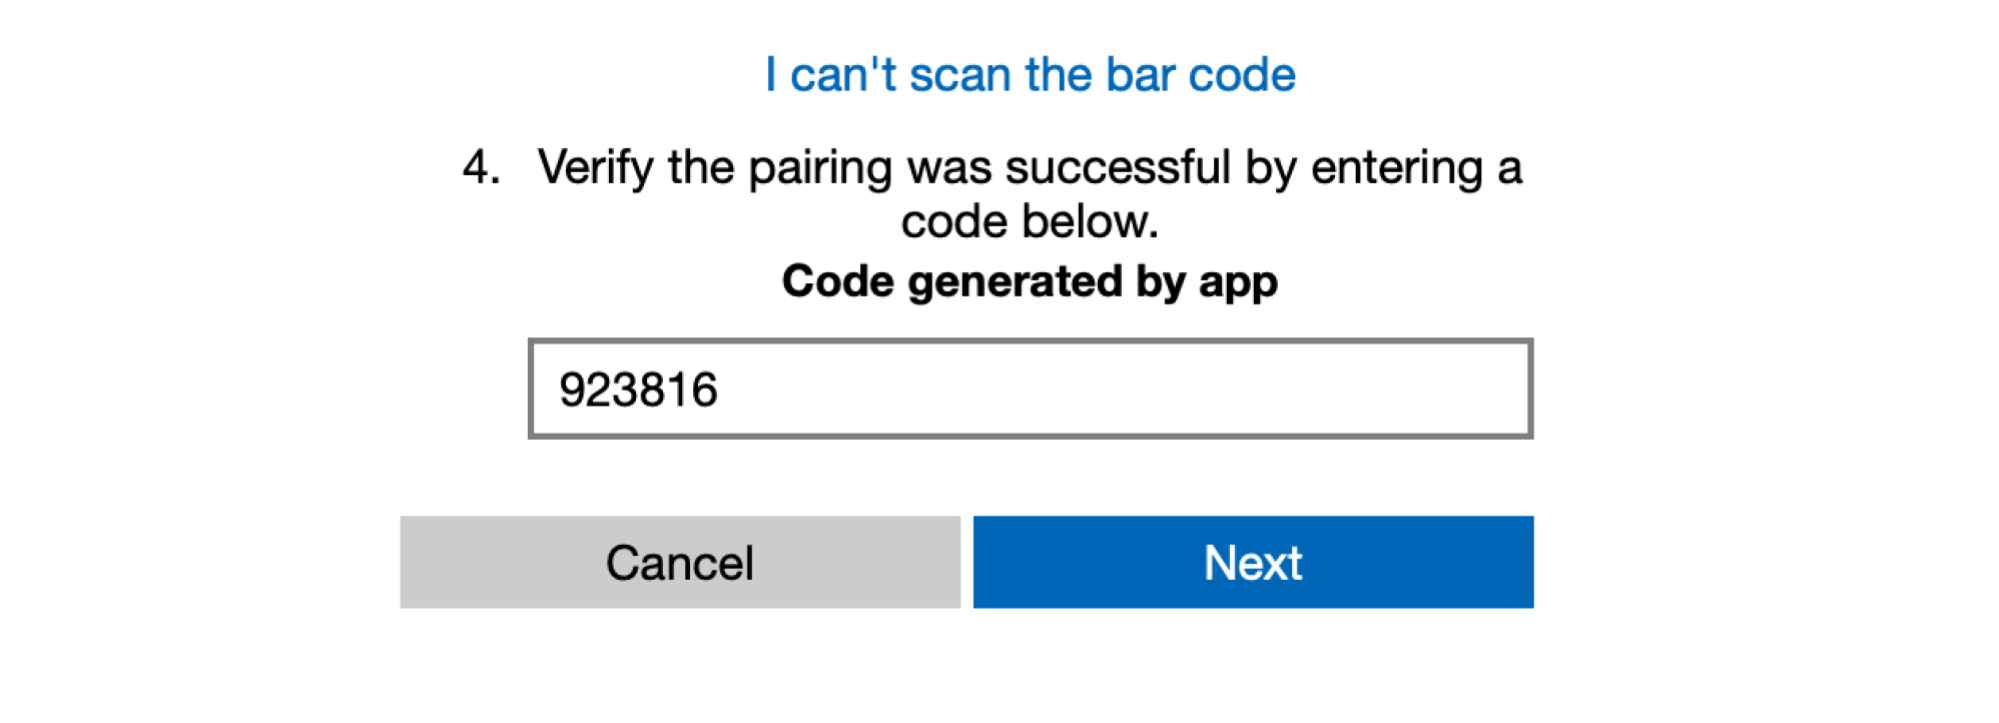
Now, go back to the website, paste in this code in the section, and follow the steps on the website.
Credit: Khamosh Pathak
And that's all there is to it. Your two-factor code will be added to your account.
Credit: Khamosh Pathak
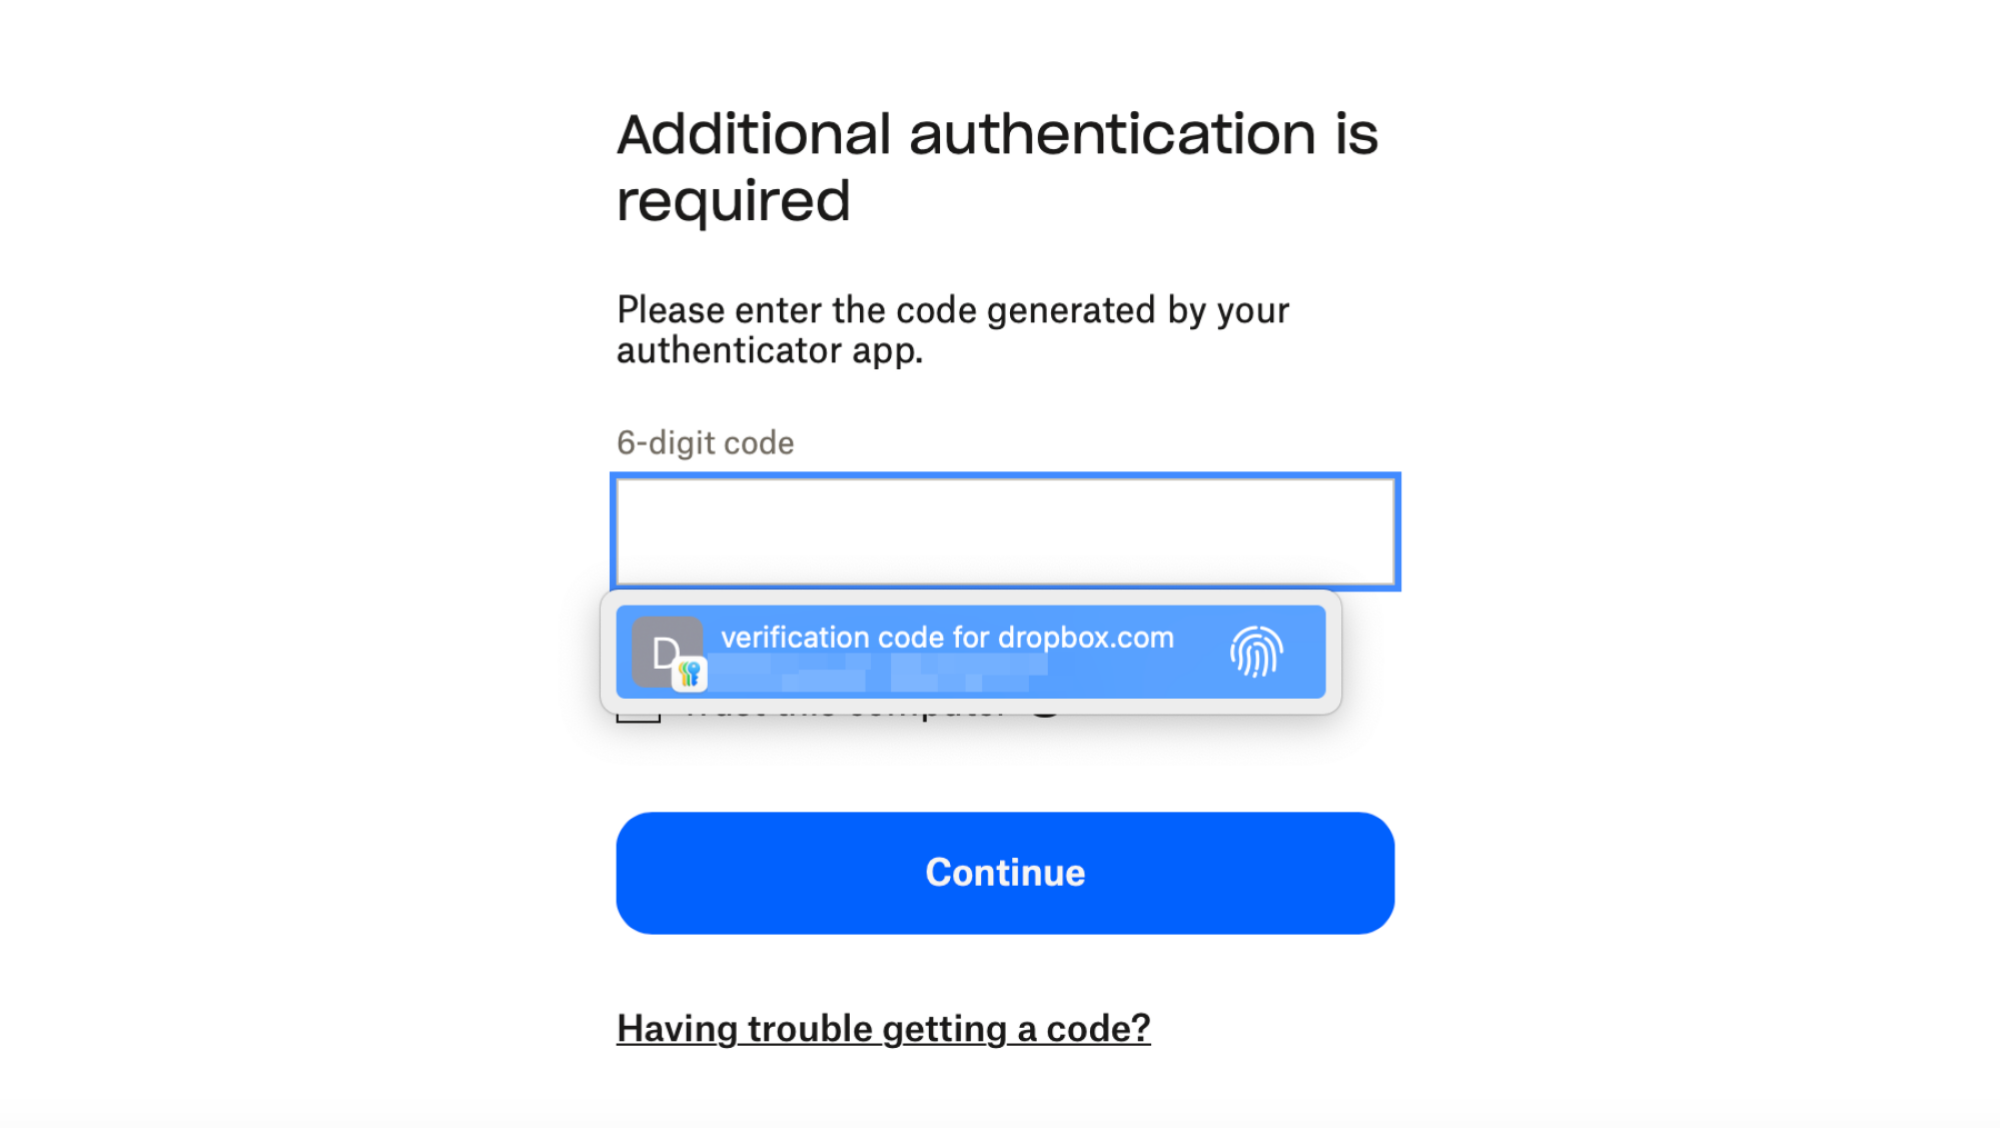
If you’re using Safari, you don’t need to hunt for the verification codes—Safari will auto-fill them for you. The next time you log in to the site, and end up at the verification page, just use Touch ID to log in.
Credit: Khamosh Pathak
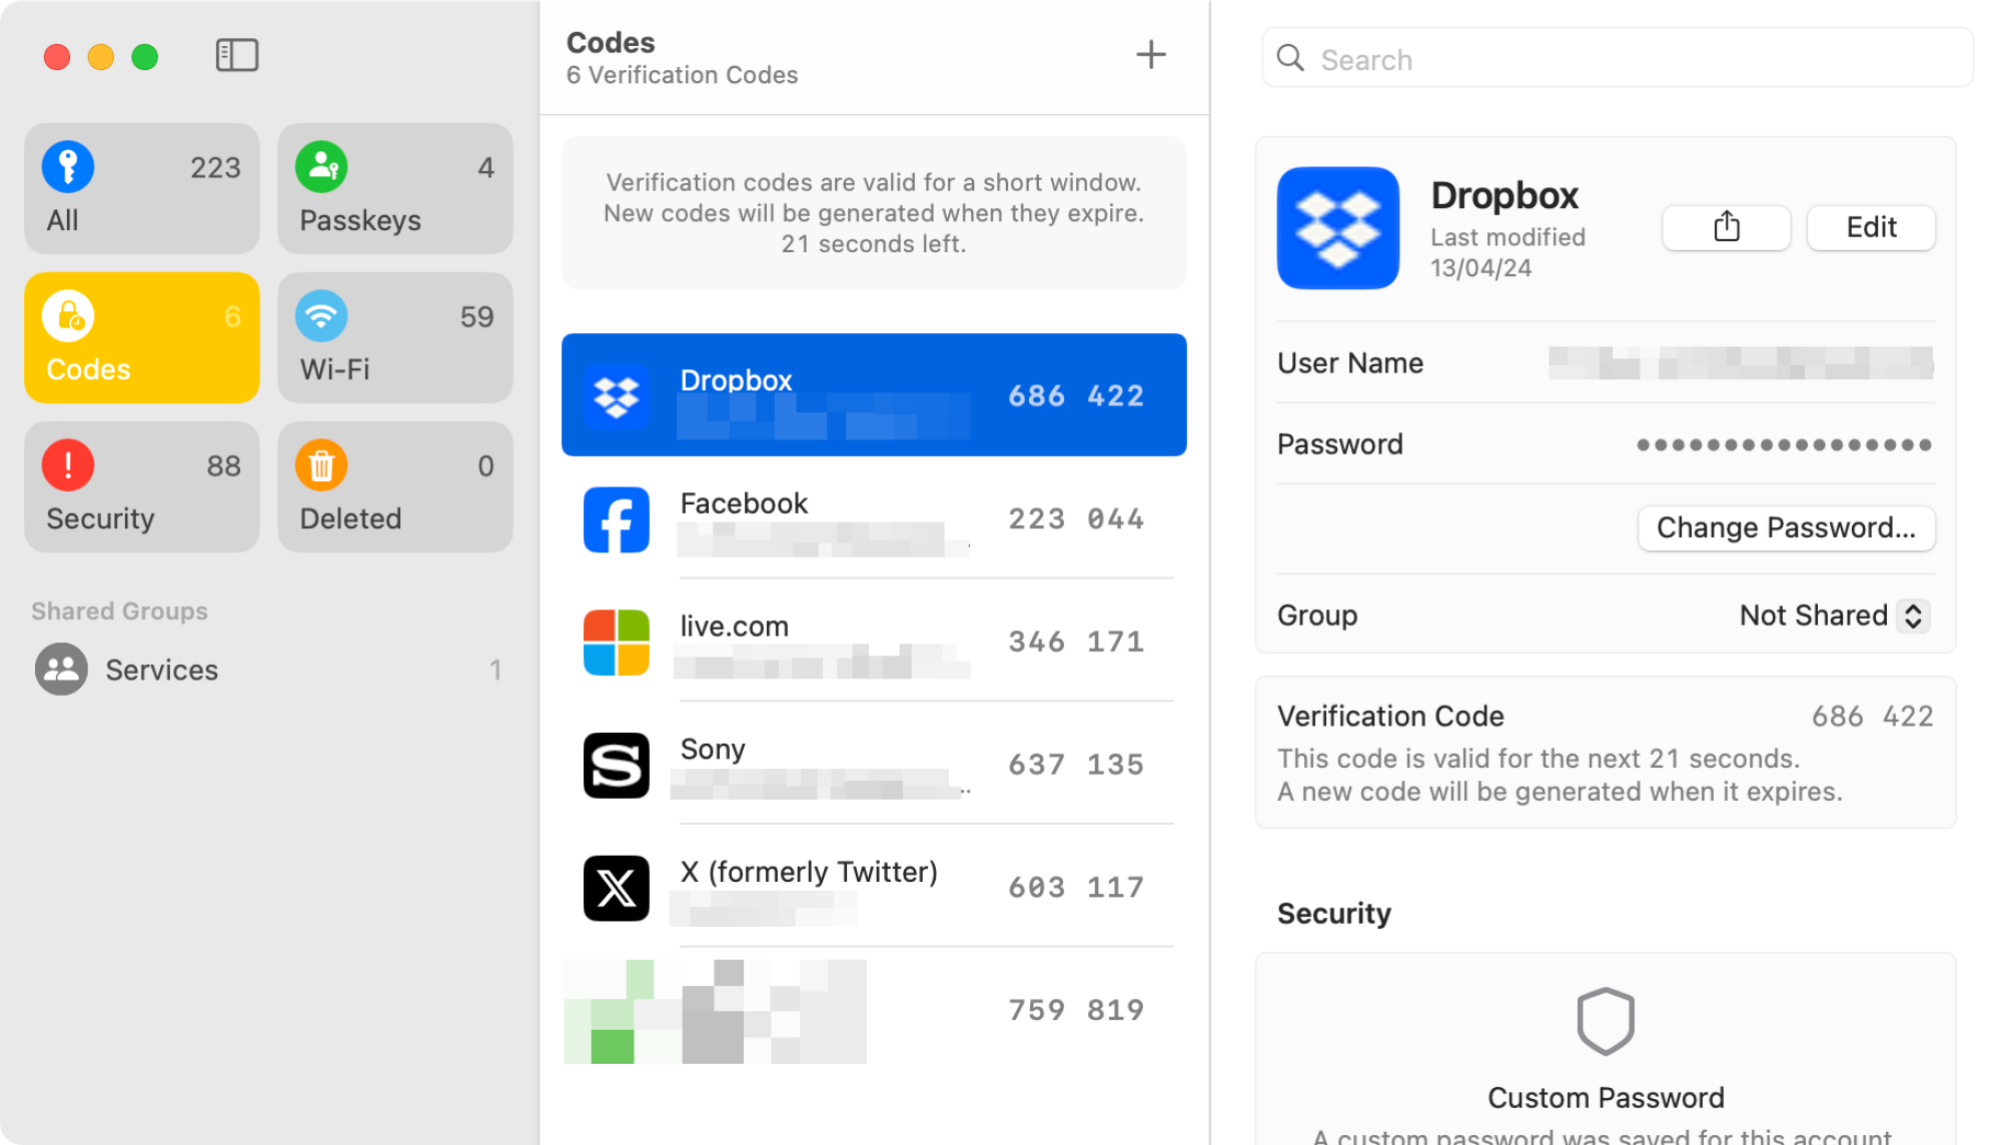
Using a different browser? It's still quite easy to find two-factor codes. Open the Passwords app, authenticate, and go to the Codes section in the sidebar. Here, you will see all your two-factor codes in a simple list. You can right-click any code to quickly copy it to your clipboard.
If you don’t want to use two-factor authentication for a website anymore, you can delete it from the Passwords app. First, make sure to disable it on the website itself (as that might require you to enter a verification code).
Then, go to the Passwords app, find the website in question, and click the “Edit” button. From the Verification Code section, click the “Delete Verification Code” button, and on the confirmation popup, choose “Delete Verification Code” again. The two-factor authentication section will now disappear.
Full story here:
Options are aplenty—Bitwarden and 1Password both have stellar two-factor authentication features built-in—but these apps cost money, and they’re ultimately third-party options, rather than something built into our devices. The new Passwords app in macOS Sequoia offers a one-stop shop to manage all your passwords. Plus, now there's a dedicated section that shows all the two-factor codes together, just like a third-party app like 1Password. This will make it easier to use two-factor codes even if you aren't using the Safari app.
This feature syncs across all your devices using iCloud, so all the two-factor codes from your iPhone will be available on your Mac, and vice versa. (Here’s how to use the two-factor process for iPhone and iPad.) And if you use Safari, you can enter two-factor authentication codes simply by using Touch ID, with no need to dig into a password management app.
How to set up two-factor authentication on Mac
Setting up two-factor authentication on macOS is easy—you can scan a QR code for an automatic setup, or enter a code manually, and you’re good to go. The process for most websites, apps, and services is the same. In this example, I'll be using a Microsoft account in the Safari browser. You’ll need to first add the website login to the Passwords app (save it to iCloud).
Note that, at time of writing, you'll need to install the macOS Sequoia beta to use this feature. It's best to do this on a backup machine if possible, as using a beta risks instability. To install the beta, open System Settings, then navigate to General > Software Update. Finally, click Beta Updates and select the macOS Sequoia developer beta.
To begin, open the website, and find the two-factor authentication feature in settings. In your Microsoft Account, go to Security > Manage how I sign in > Enter a code from an authenticator app to get started.
You'll see a new page for setting up the authenticator app. This will be similar no matter which service you're using. The default option will be to scan a QR code for automatic setup. Don't worry—you don't need to use a camera to scan this QR code. This feature is used as an express setup, to automatically link your account to the Passwords app. If you want to do it manually, you'll also find an option that says, "I can't scan the bar code." This will give you a numeric code that you can enter in the login page in the Passwords app.
In this case, I'm focusing on the QR-code setup. Simply right-click the QR code, and choose the Set Up Verification code option.

Credit: Khamosh Pathak
This will open up the Passwords app. Here, enter your device password, or use Touch ID to unlock the app.
The Passwords app will now ask you to choose the login to link the two-factor authentication. Use the search bar to find the appropriate account, and click Add Verification Code button.

Credit: Khamosh Pathak
Instantly, the two-factor authentication will be paired, and you will see a new Verification Code section in the account details. You can click the code to copy it to your clipboard.

Credit: Khamosh Pathak
Now, go back to the website, paste in this code in the section, and follow the steps on the website.

Credit: Khamosh Pathak
And that's all there is to it. Your two-factor code will be added to your account.
How to log in using two-factor authentication on Mac

Credit: Khamosh Pathak
If you’re using Safari, you don’t need to hunt for the verification codes—Safari will auto-fill them for you. The next time you log in to the site, and end up at the verification page, just use Touch ID to log in.

Credit: Khamosh Pathak
Using a different browser? It's still quite easy to find two-factor codes. Open the Passwords app, authenticate, and go to the Codes section in the sidebar. Here, you will see all your two-factor codes in a simple list. You can right-click any code to quickly copy it to your clipboard.
How to delete two-factor authentication on Mac
If you don’t want to use two-factor authentication for a website anymore, you can delete it from the Passwords app. First, make sure to disable it on the website itself (as that might require you to enter a verification code).
Then, go to the Passwords app, find the website in question, and click the “Edit” button. From the Verification Code section, click the “Delete Verification Code” button, and on the confirmation popup, choose “Delete Verification Code” again. The two-factor authentication section will now disappear.
Full story here:


